This is an absolute beginner’s guide to Async Scope in Mule 4.
Asynchronous processing is a crucial aspect of modern application development, allowing you to improve performance and scalability by executing tasks concurrently.
In Mule 4, the async scope enables you to execute parts of your Mule flows asynchronously, ensuring that your application remains responsive even during long-running operations.
This guide will cover the Async Scope definition, use case, and implementation with an example.
Prerequisites
Before you begin, ensure you have the following:
Basic understanding of Mule 4 and Anypoint Studio.
The Async scope in Mule 4 allows you to execute message processors or components asynchronously, meaning that these operations will run in the background without blocking the main flow execution thread.
This is useful for handling long-running tasks such as making HTTP requests, database queries, or I/O-bound operations.
Here, uber.12 and uber.15 are threads used to process messages.
The main flow uses uber.12 to process the message, whereas the Async scope uses uber.15 to process the message asynchronously.
Threads are dynamic and will be allocated by MuleSoft. You don’t need to worry about allocating threads. Read Thread Management in Mule 4 to understand about threads.
Realtime Example
Let’s understand how Async scope works with the help of a restaurant analogy.
Imagine you’re running a restaurant where you take orders and prepare food. Sometimes, preparing certain dishes takes a long time, like cooking a steak or baking a cake. Meanwhile, you don’t want customers to wait for their orders to be taken just because one dish takes longer to cook.
In Mule 4, the async scope works similarly. It helps you handle tasks that take longer to complete without holding up the entire process.
We’ll break down this example later in the implementation section.
When to Use Async Scope
You should consider using async scope when:
You have long-running tasks in your Mule flow that could block the main execution thread.
You want to improve the performance and responsiveness of your application by executing tasks concurrently.
You need to prevent a slow task from affecting the processing of other messages or requests.
Don’t use Async scope for logging purposes. You can make use of the Async Logger in Log4j.xml.
Limitations of Async Scope
While async scope in Mule 4 offers significant advantages regarding concurrency and performance improvement, it also has limitations. Knowing these limitations is important when designing and implementing your Mule applications.
Taking Orders: When a customer makes an order (sends a POST request to /order), the flow starts by taking their order. This part is quick and straightforward.
Preparing Food: After taking the order, the flow enters the “async scope”. Here, cooking the steak is marked with <async>, indicating that this task will be done asynchronously. This means the restaurant staff can start cooking the steak without waiting for other orders to be taken or served.
Serving Food: Once the food is prepared, it moves on to serve the food to the customer. This happens after the steak is cooked but doesn’t wait for other orders to be taken or prepared.
Using async scope here ensures that while one long task (cooking steak) is being done, the flow can continue with other tasks (taking orders or serving food) without waiting for the steak to be cooked. This helps improve the overall efficiency of the restaurant.
Now, let’s run this application and understand how Async Scope works.
Using Postman Runner, I’m running two different requests to replicate the restaurant scenario. Where one customer orders steak and the other customer orders hot dogs.
Here, Steak orders took 1037 ms, and Hot dogs took 270 ms. Hence, the steak order doesn’t block the Hot dog order.
Now, let’s dig into Mule application logs.
Can you see the difference?
Here, uber.01 is the main flow thread which takes and processes all the orders and uber.03 is an async scope thread that processes only steak orders.
All the orders are handled by uber.01 (Chef 2), however, whenever the order is steak, it will hand over the order to uber.03 (Chef 1).
The first customer ordered steak, and Chef 1 (uber.03) started preparing the order. Meanwhile, the second customer ordered hot dogs, Chef 2 (uber.01) prepared the order and served it to the customer while Chef 1 prepared the steak order.
Chef 1 and Chef 2 are just examples. However, there might be 100 chefs, and the restaurant owner(Mule) will decide which Chef to assign to prepare steak depending on his/her availability.
Likewise, Mule will take care of assigning threads to perform different tasks.
Using async scope here ensures that while one long task (cooking steak) is being done, the flow can continue with other tasks (taking orders or serving food) without waiting for the steak to be cooked. This helps improve the overall efficiency of the restaurant.
Conclusion
In this tutorial, you learned about the Async scope in Mule 4 and how it enables asynchronous processing in your Mule applications.
By leveraging Async scope, you can improve the performance and responsiveness of your applications, especially when dealing with long-running tasks. Experiment with Async scope in your Mule projects and explore its benefits further!
Integrating MuleSoft logs with Splunk enables seamless data management and robust analytics. By forwarding logs to Splunk, organizations gain real-time insights into system performance and error trends, enhancing operational efficiency and strengthening security measures.
In this guide, I will walk you through a step-by-step guide to sending MuleSoft logs to Splunk using Log4j2.
What is Splunk?
Splunk is a software platform for searching, analyzing, and visualizing large volumes of data in real-time. It helps organizations gain insights from their data by collecting, indexing, and correlating information from various sources like logs, events, and metrics.
Essentially, it’s like a powerful search engine for your data, allowing users to monitor, troubleshoot, and make informed decisions based on the information they gather.
What is Log4j2?
Log4j2 is a Java-based logging framework developers use to record information about the execution of their programs. It allows developers to easily manage and customize their applications’ logging behaviour, such as specifying which events to log, where to store the log data, and in what format.
Log4j2 helps debug, monitor, and analyze Java-based application performance by providing a flexible and efficient logging solution.
Send MuleSoft Logs to Splunk
Let’s start by understanding the problem statement and how we can use log4j2.xml to push MuleSoft application logs to Splunk.
To make it easier to follow, we’ve laid out a trail of croissants to guide your way. Whenever you see a 🥐 it means there’s something for you to do.
Prerequisites
Before you begin, ensure you have the following:
Basic understanding of Log4j2, Splunk and Mule 4
Splunk Cloud trial account or Splunk docker instance
CloudHub application logs are restricted to 30 days or 100MB, whichever comes first, which poses challenges in effective management and analysis.
This limitation risks losing valuable log data beyond the retention period, making troubleshooting past issues difficult.
Inefficient log management practices may impact compliance and application reliability.
A robust log management solution is critical to optimizing retention, facilitating efficient analysis, ensuring compliance, and maximizing the value derived from log data.
MuleSoft Application Configuration
Follow the below steps to configure Log4j2.xml to push MuleSoft logs to Splunk.
There are different methods for dealing with log forwarding to Splunk. However, in this guide, we use the Splunk Appender method.
1. Add Splunk Appender in Log4j2.xml
🥐 Navigate to src/main/resources and open log4j2.xml file.
🥐 Add the packages for com.splunk.logging and org.apache.logging.log4j in your log4j2.xml’s Configuration tag.
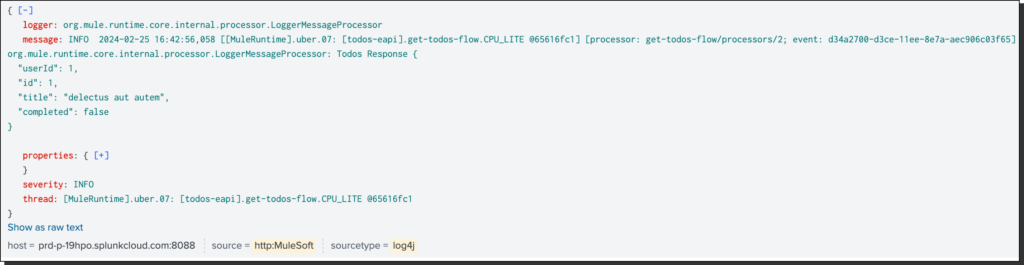
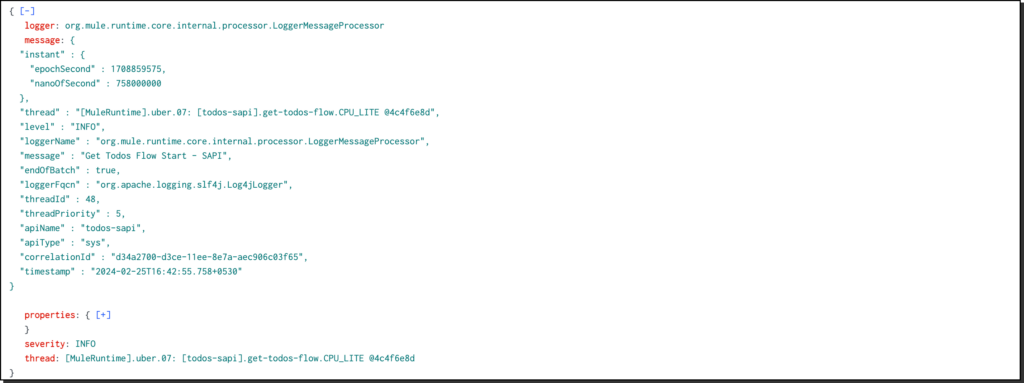
Here, you can customize the logs in different ways. For instance, you can log in just like MuleSoft logs on CloudHub, or you can use JSONLayout to log extra information just like JSON Logger.
JSONLayout formats log events into JSON (JavaScript Object Notation) format. This format is handy for structured logging because it organizes log data into key-value pairs, making it easier for various log management and monitoring tools to parse and analyze.
You can add as many as KeyValuePairs.
🥐 Add AppenderRef inside Loggers/AsyncRoot tag section
<AppenderRefref="Splunk"/>
The name of the Appender and AppenderRef should be the same.
2. Add Splunk Dependencies and Repository
🥐 Open pom.xml and add the below dependencies and repository.
Now deploy your Mule application on CloudHub. Make sure to disable CloudHub logging by checking the Disable CloudHub logs option.
This will altogether disable CloudHub logging, and you must include the appenders in your custom configurations in the log4j2.xml file to enable MuleSoft Support team visibility into the logs.
To send log data to CloudHub, add the below Appender in your log4j2.xml file.
Make sure to change the values as per your configuration. You can check with your Splunk Admin for source, index, and sourceType values.
Otherwise, if you want to learn how to create Data inputs and indexes, let me know in the comment section.
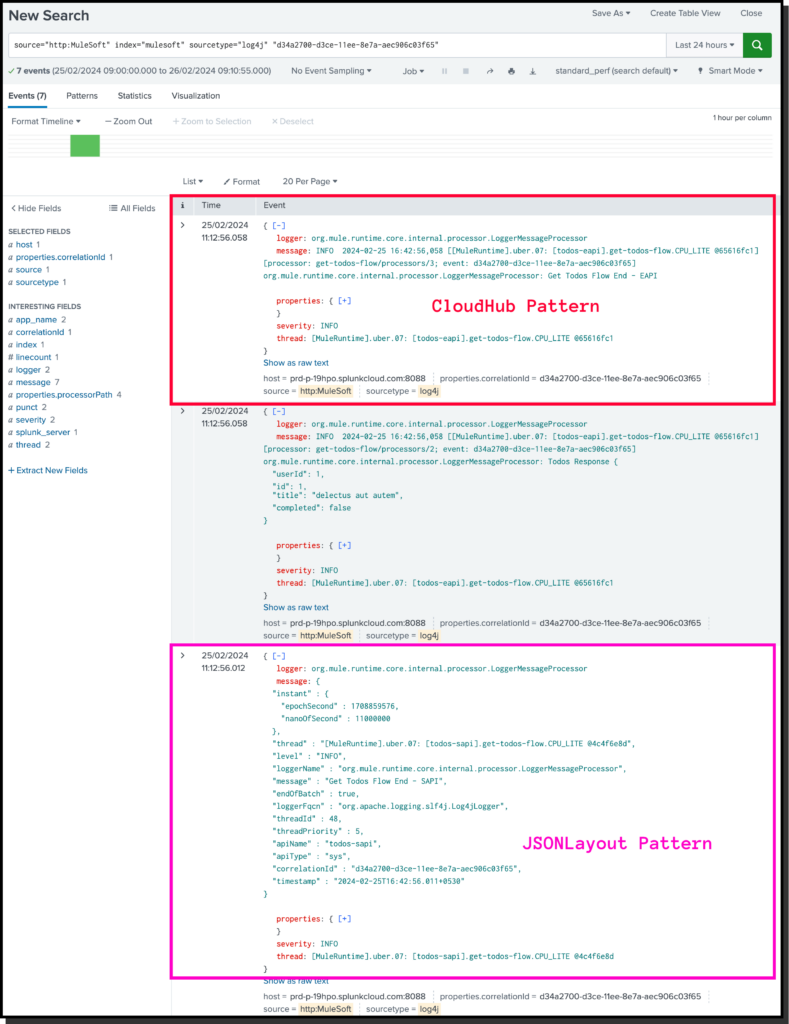
The search result?
Conclusion
In this guide, we’ve uncovered how to seamlessly push MuleSoft logs to Splunk using Log4j2. Following these steps, you can centralize log management and gain valuable insights into your applications’ performance.
We encourage you to comment with any queries or suggestions regarding this guide. Your feedback is invaluable in refining and improving the process for our readers.
For more MuleSoft guides, news and tutorials, visit our dedicated MuleSoft DevGuides portal.
Parent POM (Project Object Model) plays a crucial role in standardizing project configurations and promoting best practices, thereby enhancing the efficiency and maintainability of Mule applications developed using Maven.
In this guide, I’ll walk you through implementing Parent POM in Mule 4 and publishing it to Anypoint Exchange.
Note: I’ll be covering only Parent POM, not BOM. Let me know if you need to learn about BOM.
What is Parent POM?
A Parent POM (Project Object Model) in Mule 4 is like a master instruction manual for building Mule applications. It contains all the standard settings, dependencies, and configurations needed for multiple Mule projects within an organization.
Let’s understand with a small example.
Imagine you’re baking different types of cakes, but all cakes need flour, sugar, and eggs. The parent POM is like a recipe book with everyday ingredients and instructions.
Each specific cake recipe (or Mule project) can then build upon this foundation, adding its unique flavour (custom configurations) while still relying on the essential ingredients and instructions the parent POM provides.
So, instead of writing the exact instructions for each cake recipe separately, you have a single recipe book (the parent POM) that ensures consistency, simplifies maintenance, and helps everyone in the kitchen (development team) follow the same baking rules.
To make it easier to follow, we’ve laid out a trail of croissants to guide your way. Whenever you see a 🥐 it means there’s something for you to do.
Let’s start by understanding the problem statement and how to leverage Parent POM to solve the problem.
As a development team working on multiple Mule applications within an organization, we encounter challenges in maintaining consistency across project configurations, managing dependencies, and ensuring adherence to best practices.
Without a standardized approach, we face issues with version mismatches, redundant configurations, and difficulties in collaboration and maintenance.
Solution
Implementing a parent POM in Mule 4 can address these challenges effectively. The parent POM is a centralized configuration file that defines standard settings, dependencies, and plugins for all Mule projects within the organization.
Implementing Parent POM in Mule 4
Analysis
🥐 First, identify your integrations’ standard configurations, dependencies, and plugins list.
🥐 Go to MuleSoft release notes and note down the latest connectors versions you will use in your integration projects.
For instance, my integrations will use HTTP Connector, APIKit, Secure Property Placeholder, Salesforce, Object Store, and Anypoint MQ.
🥐 Open any project’s POM file, and you’ll find the sections below. As these are common across all projects, we can move these configurations, plugins and dependencies to Parent POM.
<properties>
<build>
<dependencies>
<repositories>
<pluginRepositories>
Parent POM Configuration
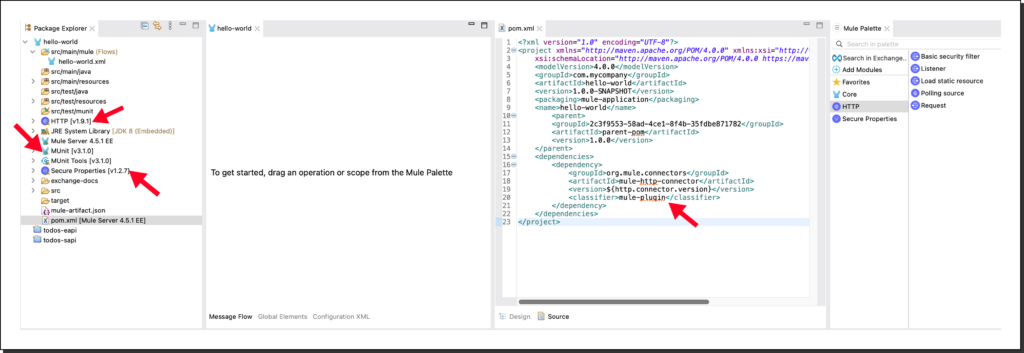
🥐 Open any folder and create a file called pom.xml.
🥐 Copy & paste the content below content in your pom.xml.
Let’s add the name, artifactId, groupId and other values.
<modelVersion>4.0.0</modelVersion><groupId>{add your Anypoint Platform OrgId}</groupId><artifactId>parent-pom</artifactId><packaging>pom</packaging><version>1.0.0</version><name>parent-pom</name>
groupId must be your Anypoint Platform Organization ID if you’re deploying Assets to Anypoint Exchange.
If you deploy and manage your Assets in other Artifacts, such as Azure, you can update groupId to anything you wish.
I go with com.<company>.parentpom. Please don’t add your complete company name; make it short. For instance, com.acme.parentpom.
Properties
🥐 Add all the required properties, including connector and module versions.
This is where you can add all the connectors and module versions you intend to use in your integration projects.
Below are the generic properties for all Mule projects, so let’s add them first.
Make sure to check Java compatibility for the Mule Maven Plugin. Mule Maven 4.1.1 will support Java 8, 11, and 17. Mule Maven 3.8.2will support Java 8.
I use Java 11 with the Maven 3.9.x version, so Mule Maven 4.1.1 will work for me. If you’re using Java 8 and Maven 3.6.3 to 3.8.6, please use Mule Maven 3.8.7.
Refer to Mule Maven release notes for more information.
🥐 Next, add the required Connectors, Modules and Custom Plugin versions.
<properties><!-- Mule Connectors and Modules --><organizationId>{add your Anypoint Platform OrgId}</organizationId><apikit.version>1.10.3</apikit.version><http.connector.version>1.9.1</http.connector.version><amq.connector.version>4.0.6</amq.connector.version><sfdc.connector.version>10.19.4</sfdc.connector.version><mule.secure.config.version>1.2.7</mule.secure.config.version><os.connector.version>1.2.2</os.connector.version><!-- Specifcy Asset Type--><type>custom</type><!-- CloudHub Deployment Properties--><mule.cloudhub.monitoring.enabled>true</mule.cloudhub.monitoring.enabled></properties>
Make sure to add type as custom – <type>custom</type>
Build
🥐 In <build> section, define plugin versions and configurations applied globally to all child projects.
It allows you to centralize plugin configurations in a parent POM so that child projects can inherit and use them without explicitly specifying the plugin versions and configurations again.
Add Mule-related Maven plugins, Generic Maven plugins, CloudHub or other deployment target configurations here and Mule extension-related plugins.
These plugins and configurations are generic for all Mule projects, so it is better to add them in pluginManagement section.
There are two plugin configurations:
mule-maven-plugin (required)
munit-maven-plugin (required)
exchange-mule-maven-plugin is required only for Exchange deployment.
<build><pluginManagement><plugins><!-- Mule Maven Plugin and CloudHub Deployment Configuration--><plugin><groupId>org.mule.tools.maven</groupId><artifactId>mule-maven-plugin</artifactId><version>${mule.maven.plugin.version}</version><extensions>true</extensions><configuration><cloudHubDeployment><uri>https://anypoint.mulesoft.com</uri><muleVersion>${mule.app.runtime}</muleVersion><username>${mule.cloudhub.username}</username><password>${mule.cloudhub.password}</password><applicationName>${mule.cloudhub.app.name}</applicationName><environment>${mule.env}</environment><region>${mule.region}</region><workerType>${mule.workerType}</workerType><workers>${mule.workers}</workers><objectStoreV2>true</objectStoreV2><properties><mule.env>${mule.env}</mule.env><mule.encryptionKey>${mule.encryptionKey}</mule.encryptionKey><mule.cloudhub.https.port>${mule.cloudhub.https.port}</mule.cloudhub.https.port><anypoint.platform.client_id>${mule.cloudhub.env.client.id}</anypoint.platform.client_id><anypoint.platform.client_secret>${mule.cloudhub.env.client.secret}</anypoint.platform.client_secret><mule.monitoringEnabled>${mule.cloudhub.monitoring.enabled}</mule.monitoringEnabled><anypoint.platform.config.analytics.agent.enabled>${mule.cloudhub.monitoring.enabled}</anypoint.platform.config.analytics.agent.enabled></properties></cloudHubDeployment><classifier>mule-application</classifier></configuration></plugin><!-- Mule MUnit Plugin--><plugin><groupId>com.mulesoft.munit.tools</groupId><artifactId>munit-maven-plugin</artifactId><version>${munit.version}</version><executions><execution><id>test</id><phase>test</phase><goals><goal>test</goal><goal>coverage-report</goal></goals></execution></executions><configuration><runtimeVersion>${mule.app.runtime}</runtimeVersion><systemPropertyVariables><mule.env>munit</mule.env></systemPropertyVariables><coverage><runCoverage>true</runCoverage><failBuild>true</failBuild><requiredApplicationCoverage>${munit.testcoverage.app}</requiredApplicationCoverage><requiredResourceCoverage>${munit.testcoverage.resource}</requiredResourceCoverage><requiredFlowCoverage>${munit.testcoverage.flow}</requiredFlowCoverage><formats><format>console</format><format>html</format><format>json</format><format>sonar</format></formats></coverage></configuration></plugin><!-- It's required only for Exchange Deployment--><plugin><groupId>org.mule.tools.maven</groupId><artifactId>exchange-mule-maven-plugin</artifactId><version>${exchange.mule.maven.plugin}</version><executions><execution><id>validate</id><phase>validate</phase><goals><goal>exchange-pre-deploy</goal></goals></execution><execution><id>deploy</id><phase>deploy</phase><goals><goal>exchange-deploy</goal></goals></execution></executions></plugin></plugins></pluginManagement></build>
You must pass the CloudHub Deployment properties in Runtime through the CI/CD pipeline.
Distribution Management
🥐 In distributionManagement section, specify where the built artefacts should be deployed. Typically, it’s used in the parent POM file to define the deployment repositories, and child projects inherit these settings.
In our case, we will deploy artefacts to Anypoint Exchnage, so add Exchnage repository details.
Don’t add project-specific dependencies because it’s a centralized Parent POM; whatever you define here will be added to your Project. For instance, if you add Salesforce dependencies, they will be added to all your Projects (Exp, Process and Sys).
Repositories
Repositories are used to specify locations from where Maven can retrieve project dependencies. These dependencies typically include libraries and frameworks your project relies on for compilation, testing, and execution.
Maven searches these repositories to download JAR files and other artefacts needed for the build process.
Examples of regular repositories include Maven Central Repository and other public or private repositories hosting Java libraries and dependencies.
🥐 In repositories section, add repos such as Exchange v3, Mule EE, etc.,
I have also included the Azure Artifect repository for your reference. For Exchange deployment, you can ignore this repo.
If you don’t have a licence for enterprise, please remove the Nexus repo mulesoft-ee reference because it requires a username and password.
Plugin Repositories
Plugin repositories are explicitly used to specify locations from where Maven can retrieve plugins necessary for building or managing the project.
These plugins extend Maven’s functionality and are often used for tasks such as compiling code, packaging applications, running tests, and deploying artefacts.
Maven searches these repositories to download plugin artefacts required for executing build goals defined in the project’s lifecycle.
The main difference between Repositories and Plugin Repositories is regular repositories provide dependencies needed by your project. In contrast, plugin repositories provide plugins needed by Maven to perform various build tasks on your project.
🥐 In pluginRepositories section, add plugin repos such as Mule Nexus, Mule Public, etc.
🥐 Open settings.xml file and add your credentials inside servers section.
You can find settings.xml in conf folder -> apache-maven-3.9.6/conf.
I have downloaded and placed it in my Developer folder -> /Users/effinium/Developer/Software/apache-maven-3.9.6/conf. Yours will be located in a different folder.
Voilà, we have added only HTTP Connector, but how was the MUnits and Secure Properties module added to the project?
Do you remember that we have added three dependencies in the <dependenciesManagement> section? That means, by default, we’re adding these dependencies in all the Mule projects.
Later, if you want to add a Salesforce connector to your project, add Salesforce dependency and update the connector version.
The version tag name must match the version tag name defined in the Parent POM properties file.
Question – Nag, why can’t we add all dependencies in Parent POM rather than in Project’s POM?
Let’s assume we have added HTTP Connector dependency in Parent POM. Now, if we add a Parent POM reference in the Project’s POM, the HTTP Connector will also added to the project.
However, I’m developing a system API that doesn’t need an HTTP Connector because my requirement is subscribing to platform events and inserting them into the database.
Does adding a connector or module that is not usable in the Project make sense? NO.
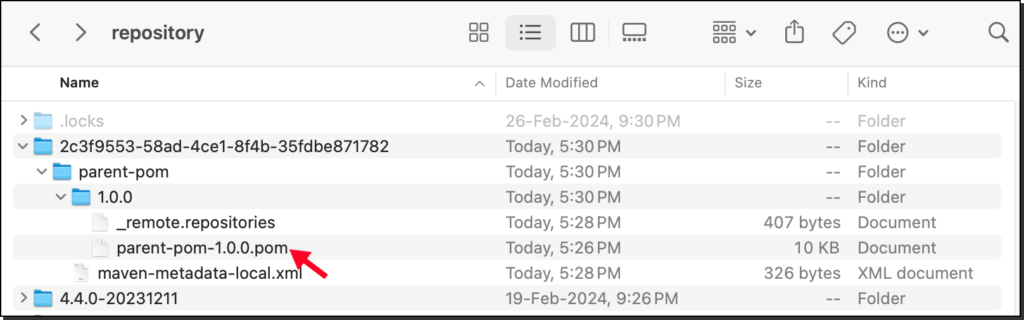
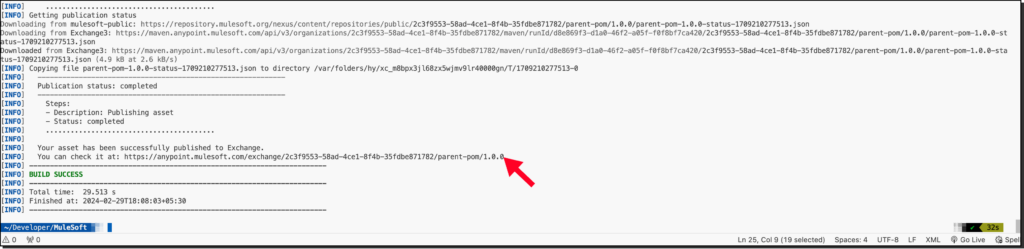
🥐 Now run mvn clean deploy -DmuleDeploy to publish Parent POM to Anypoint Exchange.
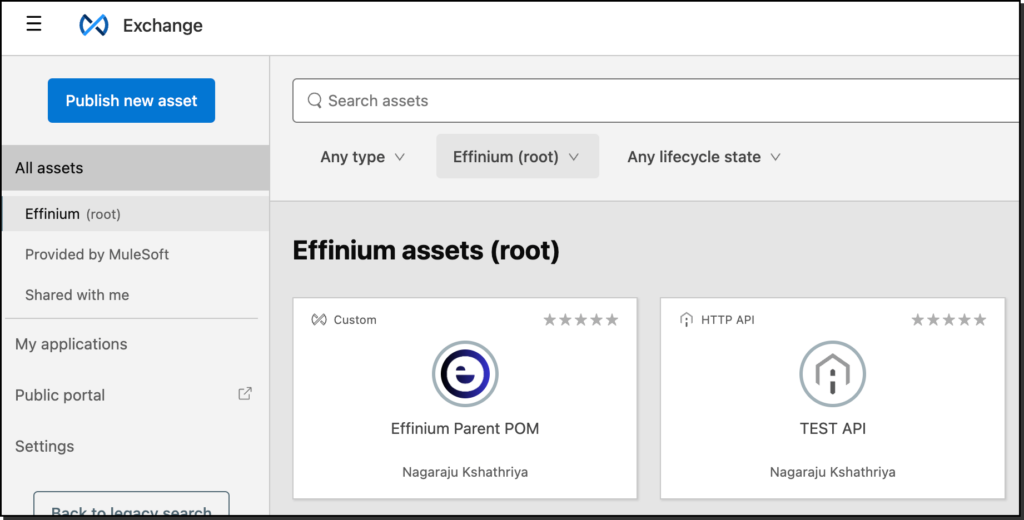
🥐 Open Anypoint Exchange and search for Parent POM.
Note: I have updated the name and icon to protect my content from copycats smiles :).
Conclusion
Implementing a parent POM (Project Object Model) in Mule projects offers numerous benefits, streamlining development efforts, ensuring consistency, and promoting best practices across the organization.
By centralizing standard configurations, dependencies, and plugin configurations, developers can avoid redundant settings and maintain a cohesive structure throughout their projects.
In this guide, we have covered a step-by-step process to implement Parent POM in Mule and published it to Anypoint Exchange.
We encourage you to comment with any queries or suggestions regarding this guide. Your feedback is invaluable in refining and improving the process for our readers.
For more MuleSoft guides, news and tutorials, visit our dedicated MuleSoft DevGuides portal.